
Moving house from an adults point of view is without doubt a monumental exhausting task. But, seeing it from a child's point of view turns it into an adventure. Its a journey of re-discovery and finding new shelves and toy boxes to put their beloved belongings is like a game. And then there's the fun on of the empty cardboard box and all its possibilities!
We discovered along the way paper bags full of memories of places we have been, countries we have visited and outings we have enjoyed. It seemed unjust to simply return them to their nondescript paper bags to be hidden in a drawer and forgotten about and we couldn't put them into our scrapbook as they didn't belong to the adventures of this current year.
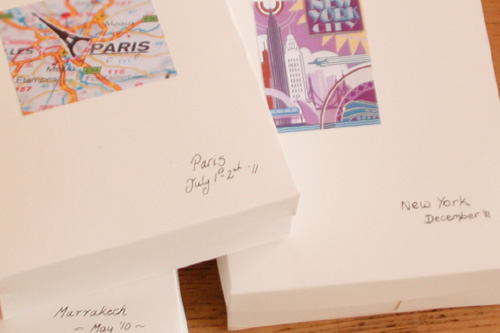
So, we've been busy making keepsake boxes. These boxes are like catalogues of memories we can revisit and enjoy much like a photo album only filled with the ticket stubs, postcards and the paraphernalia we've collected with each experience.
They're easy to create and you can personalise them in any way you wish, making each one your very own treasure box of memories. They would make great gifts too and making them in advance of a trip would make the awaiting adventure all the more exciting as you collect things to put inside. I think they would make a great alternative to the plastic party bags and you could personalise them for each guest with a initials or a picture of the guest who'll receive it. If you really want to elaborate further why not cover your card with fabric.

Here's what you'll need:
- Card
- pencil
- ruler
- scissors
- glue stick
- decorations e.g map, stamps, labels

Here's how:
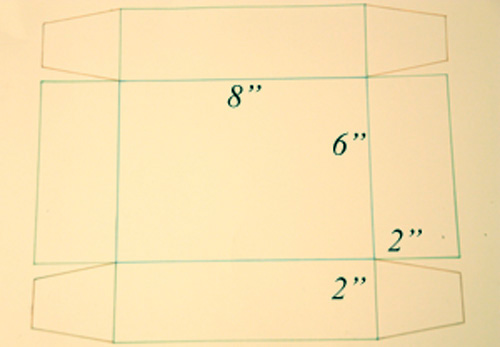
- Begin by marking the outlines of your box: The size of the box you make will of course depend on what you intend to keep inside. Here the boxes were made to include a large postcard so the base of my box needed to measure 8" by 6".
- To use the same measurements used here begin by drawing a rectangle 8" x 6". Then along each edge draw a further rectangle 2.5" deep and following the length of each side. Finally add on the flaps.
- In order to make the lid you first need a rectangle measuring the same as you base adding on a tiny amount to allow to fit over the box edges without squeezing. 8.1" x 6.1". Then as before measure and mark a rectangle along each edge. The ones here measure 1" deep. Finally add the flaps.
- Cut out your templates
- Score along each marked line to fold up each side to give the card its box shape.
- Do the same for the lid.
- Glue the back of the flaps so they stick to the inside of the box pressing firmly and making sure each edge is at its 90 degree angle. Repeat for the lid.
- Now to finish it off with your chosen labels, dates and pictures.
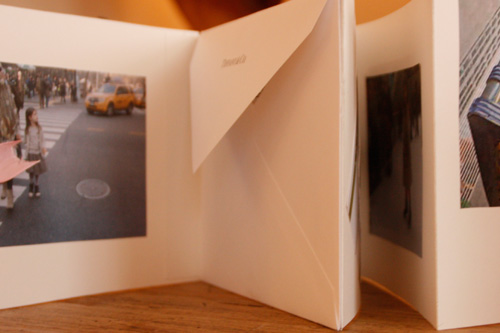
If you would like to create a 'pull out album' concertina strips of card using the same measurement as the base of your box. To make the concertina longer add a flap that can be folded and adhered to the end of each concertina end. As a delicate finishing touch punch a hole in the top piece of your folded album and tie a ribbon through.
Fill with memories and enjoy
This is part of our Monday Makery; a weekly craft or recipe to make or bake.
Our other popular blogposts include 'The story behind our collections', 'Tell us its Tuesday' , An A-Z of Sisters Guild, The Art of Living posts bring you all the things we are passionate about and the things we discover in our lives as mamas, and our 'Once upon a week' gives you a glimpse into life behind the scenes at Sisters Guild.
www.sistersguild.co.uk
Sign up for future news and offers:
No comments:
Post a Comment